![Kasper Logo-2.png]](https://knowledge.meetkasper.com/hs-fs/hubfs/Kasper%20Logo-2.png?height=25&name=Kasper%20Logo-2.png)
What you can do
The Email Template Builder lets you create campaign emails that look like your office. Add your logo, images, buttons, links, and patient details, or import a design made with AI or another tool. Build a template once, then reuse it in any campaign.
You do not have to start from a blank page. Kasper includes preset templates made for you, such as recall reminders, review requests, and post-op instructions. Pick one, adjust it for your office, and send it. This guide has two paths:
• Edit a preset template and send it is the fastest way to get an email out.
• Create a template step by step shows you how to build your own from scratch.
Before you start
• Check your Brand Customization. The Office Header block uses the cover image, logo, and name from your office's Brand Customization settings. Update them there first.
• Have your image ready. Save it as a PNG or JPG on your computer. A banner image works well at the top of an email.
• Have your HTML ready (optional). If you are importing a design, copy the code so it is ready to paste. See the guide on using AI to create a template.
Edit a preset template and send it
Preset templates are ready to use. They already include your Office Header and Footer, wording written for dental offices, and merge tags that fill in each patient's details. You only need to adjust them for your office.
Available preset templates
|
Template |
Use it to |
|
Hygiene Reminder Due |
Remind patients that their cleaning and checkup is coming up |
|
Hygiene Reminder Overdue |
Reach patients who missed their cleaning due date and invite them back |
|
Treatment Plan Follow Up |
Follow up with patients who have recommended treatment that is not yet scheduled |
|
Review Reminder |
Ask patients to leave a review after their visit |
|
Post Op Instructions |
Send care instructions after a procedure |
|
Holiday Greeting |
Send seasonal wishes and any holiday office hours |
|
End of Year Benefits |
Remind patients to use their remaining insurance benefits before the year ends |
Adjust a preset
1. In the left menu, click Email Templates.
2. Find the preset you want, or type its name in the search box. Click the Action menu (three dots) on its row and choose Preview to see how it looks.
3. If you want to keep the original untouched, choose Duplicate first and rename your copy. Then choose Edit on the copy.
4. Click each text block to change the wording. Keep the merge tags, such as {First Name} and {Practice Phone}, exactly as written. Use Tag in the toolbar to add more.
5. Click the banner image, then Replace image to use your own photo or graphic. Update the Alt text to match.
6. Click the button. Set the button text and link address in the right panel. For a booking button, paste your office's scheduling link.
7. Check the Office Header and Footer. If your logo or name looks wrong, update your Brand Customization settings.
8. Click Save Individual, then Save & continue to Family. Read the Family version, fix any singular wording, and click Save Family.
9. Open Preview and check both the desktop and mobile views.
Send it
When your template is saved, it is ready to use in a campaign.
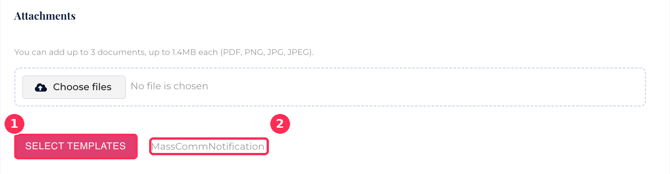
1. When you set up your campaign, scroll down to the Attachments area and click SELECT TEMPLATES. The name next to the button shows the template currently selected.
2. In the Email Templates window, open the Templates names list and click the template you want. Your preview appears underneath.
3. Click Done.
4. Finish your campaign and save or schedule it as you normally do.
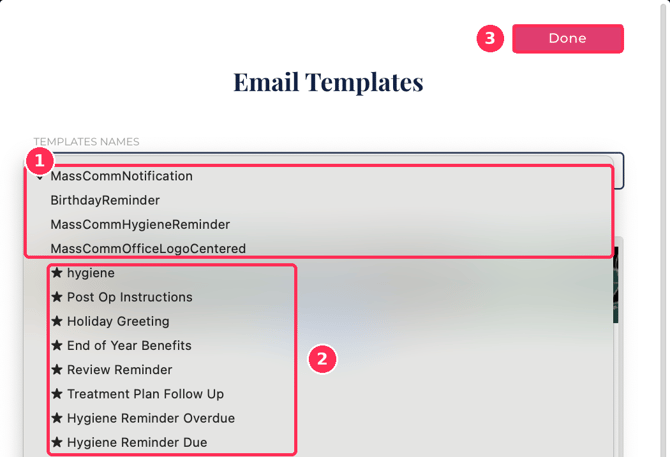
1. Other templates. Templates without a star.
2. Starred templates. Templates made in the Email Template Builder, including the presets and the ones you create, show a star.
3. Done. Click it to confirm your choice.
Create a template step by step
Build the layout first, then add the header and footer, then your content. This takes about five minutes.
Part 1: Open the builder and set up the layout
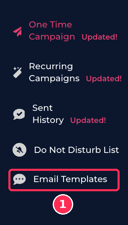

1. In the left menu, click Email Templates, then click + New Template.
2. Type a name in the Template name box at the top, for example "Hygiene Reminder Overdue."
3. In the Layouts section of the left panel, click 1 column. A new row appears on the canvas. Click it again to add more rows. A simple email needs three rows: one for the header, one for your content, and one for the footer.
Need side-by-side content? Choose 2 columns, 3 columns, 1:2, or 2:1 instead of 1 column.
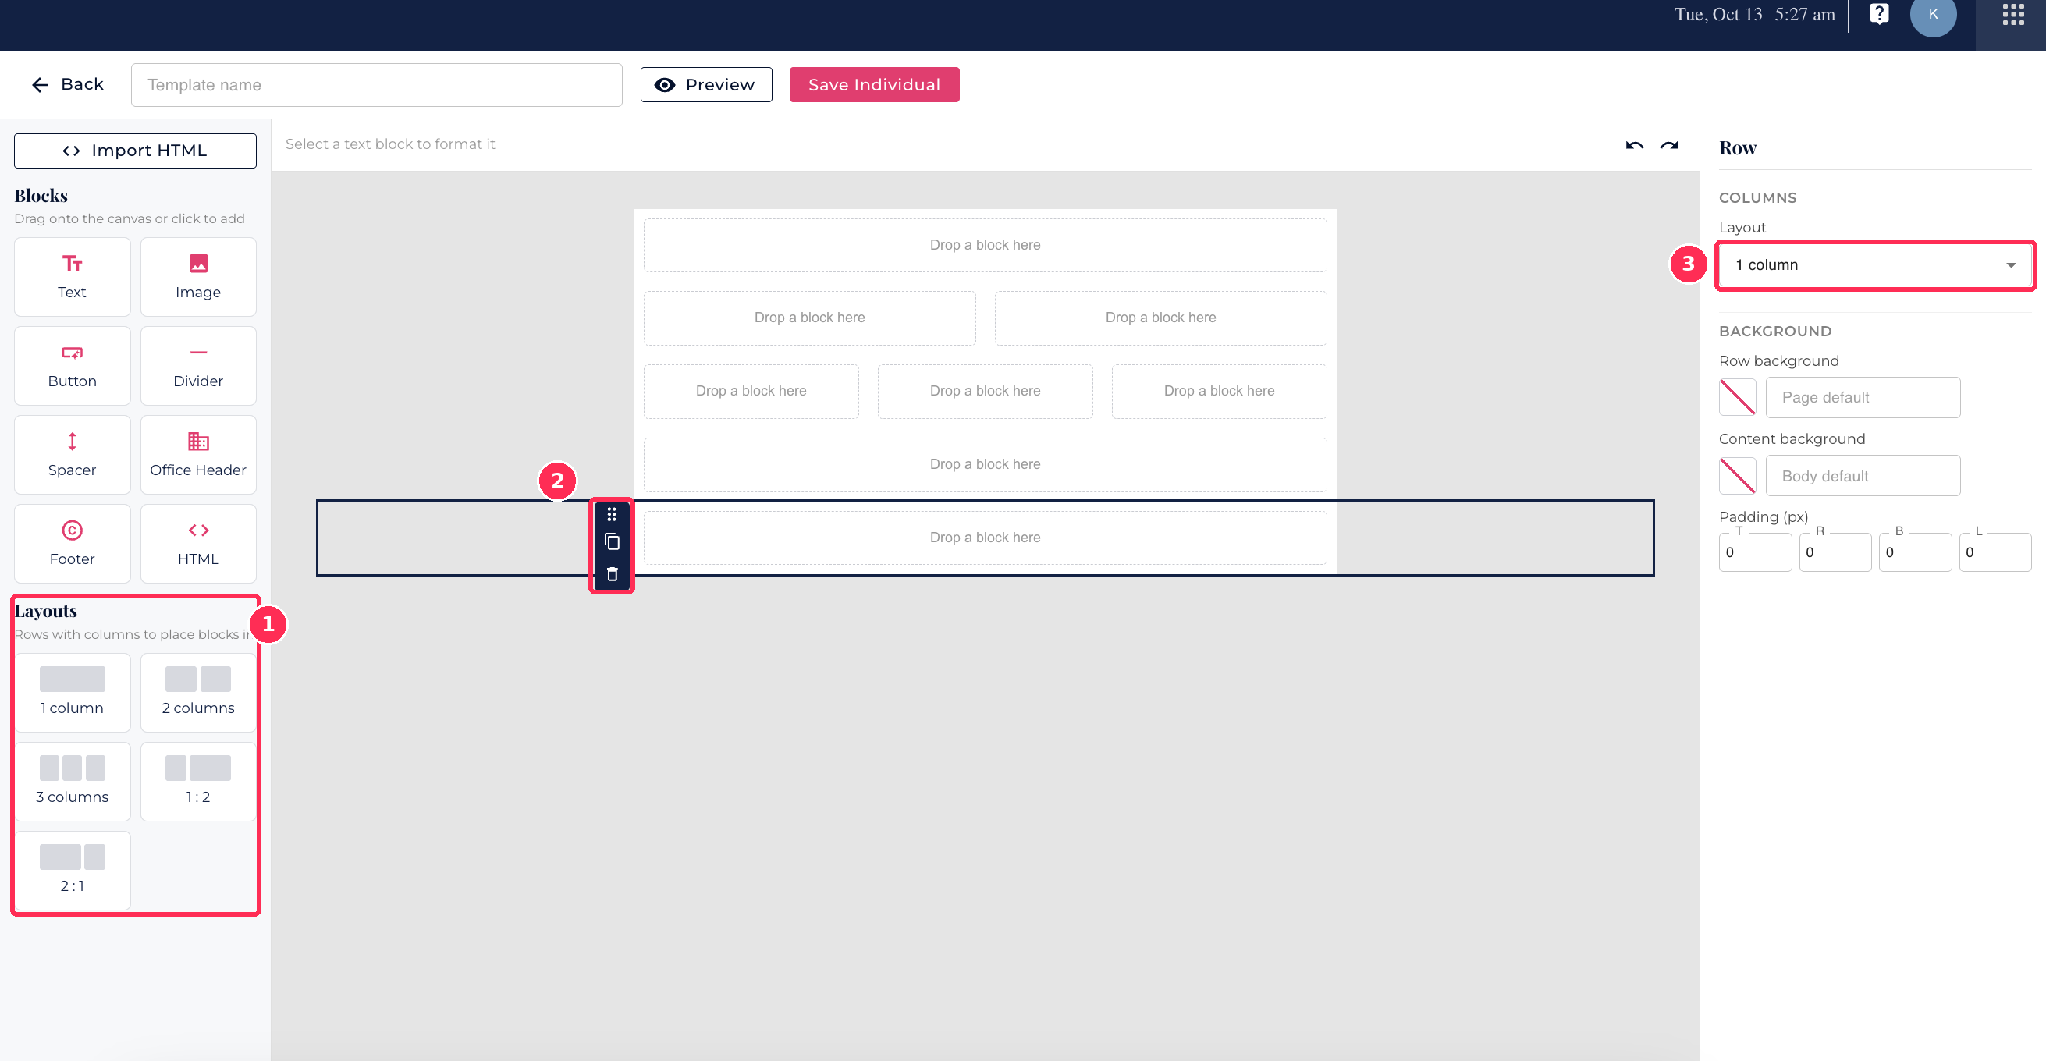
1. Layouts. Click a layout to add a row to the canvas: 1 column, 2 columns, 3 columns, 1:2, or 2:1. The rows in this example show each layout.
2. Row toolbar. Click a row to select it. Use the dotted handle to move the row, the copy icon to duplicate it, and the trash icon to delete it.
3. Row settings. With a row selected, the right panel lets you change its Layout (for example, from 1 column to 2 columns), its Row background and Content background colors, and its Padding (top, right, bottom, left, in px).
Part 2: Add your office header and footer
5. In the Blocks section, click Office Header. It adds your office cover image, logo, and name from your Brand Customization settings. Use the Logo size (px) setting in the right panel to resize the logo.
6. Click Footer. It adds a footer that reads "Copyright 2026 {Practice Name}, All rights reserved." You can change its colors and spacing in the right panel.
7. Check the order on the canvas: header on top, footer on the bottom, and an empty Drop a block here row between them for your content.
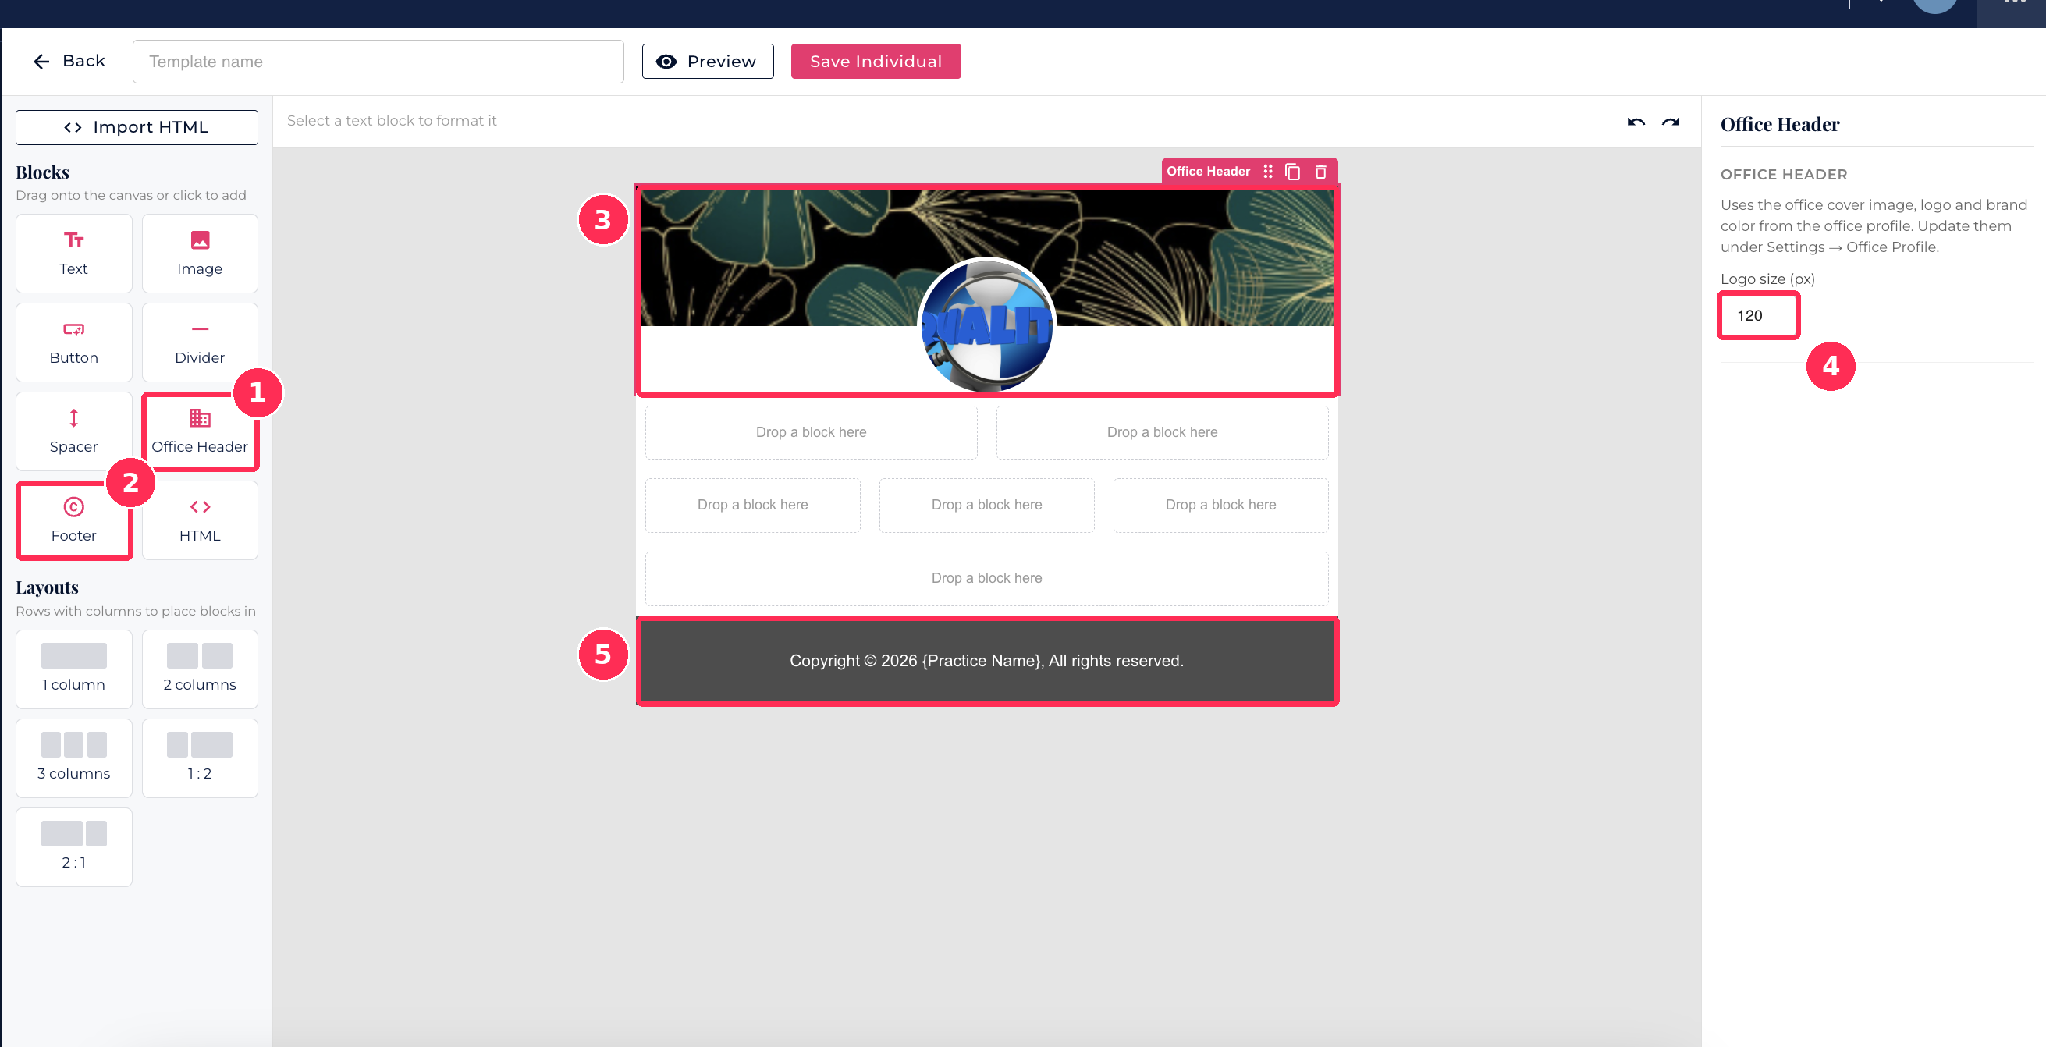
1. Office Header block in the Blocks section.
2. Footer block in the Blocks section.
3. Office Header on the canvas. It shows your cover image and logo. Click it to see its settings on the right.
4. Logo size (px). Change the number to make your logo bigger or smaller.
5. Footer on the canvas. It shows the copyright line with your practice name filled in when the email is sent.
If a block lands in the wrong place, use the handle on the left side of its row to move it. Use the trash icon to remove empty rows you do not need.
Part 3: Add your content
You can add content in two ways. Use either one, or mix them.
Option A: Import HTML code (best for a ready-made design)
8. Click the empty Drop a block here row where you want the content.
9. Click Import HTML at the top of the left panel.
10. Paste your code into the box (Cmd + V on Mac, Ctrl + V on Windows).
11. Click Add as a block. Do not choose Replace template, because that replaces your header and footer too.
12. If the new block lands below the footer, use the handle on the left of its row to move it up between the header and footer.
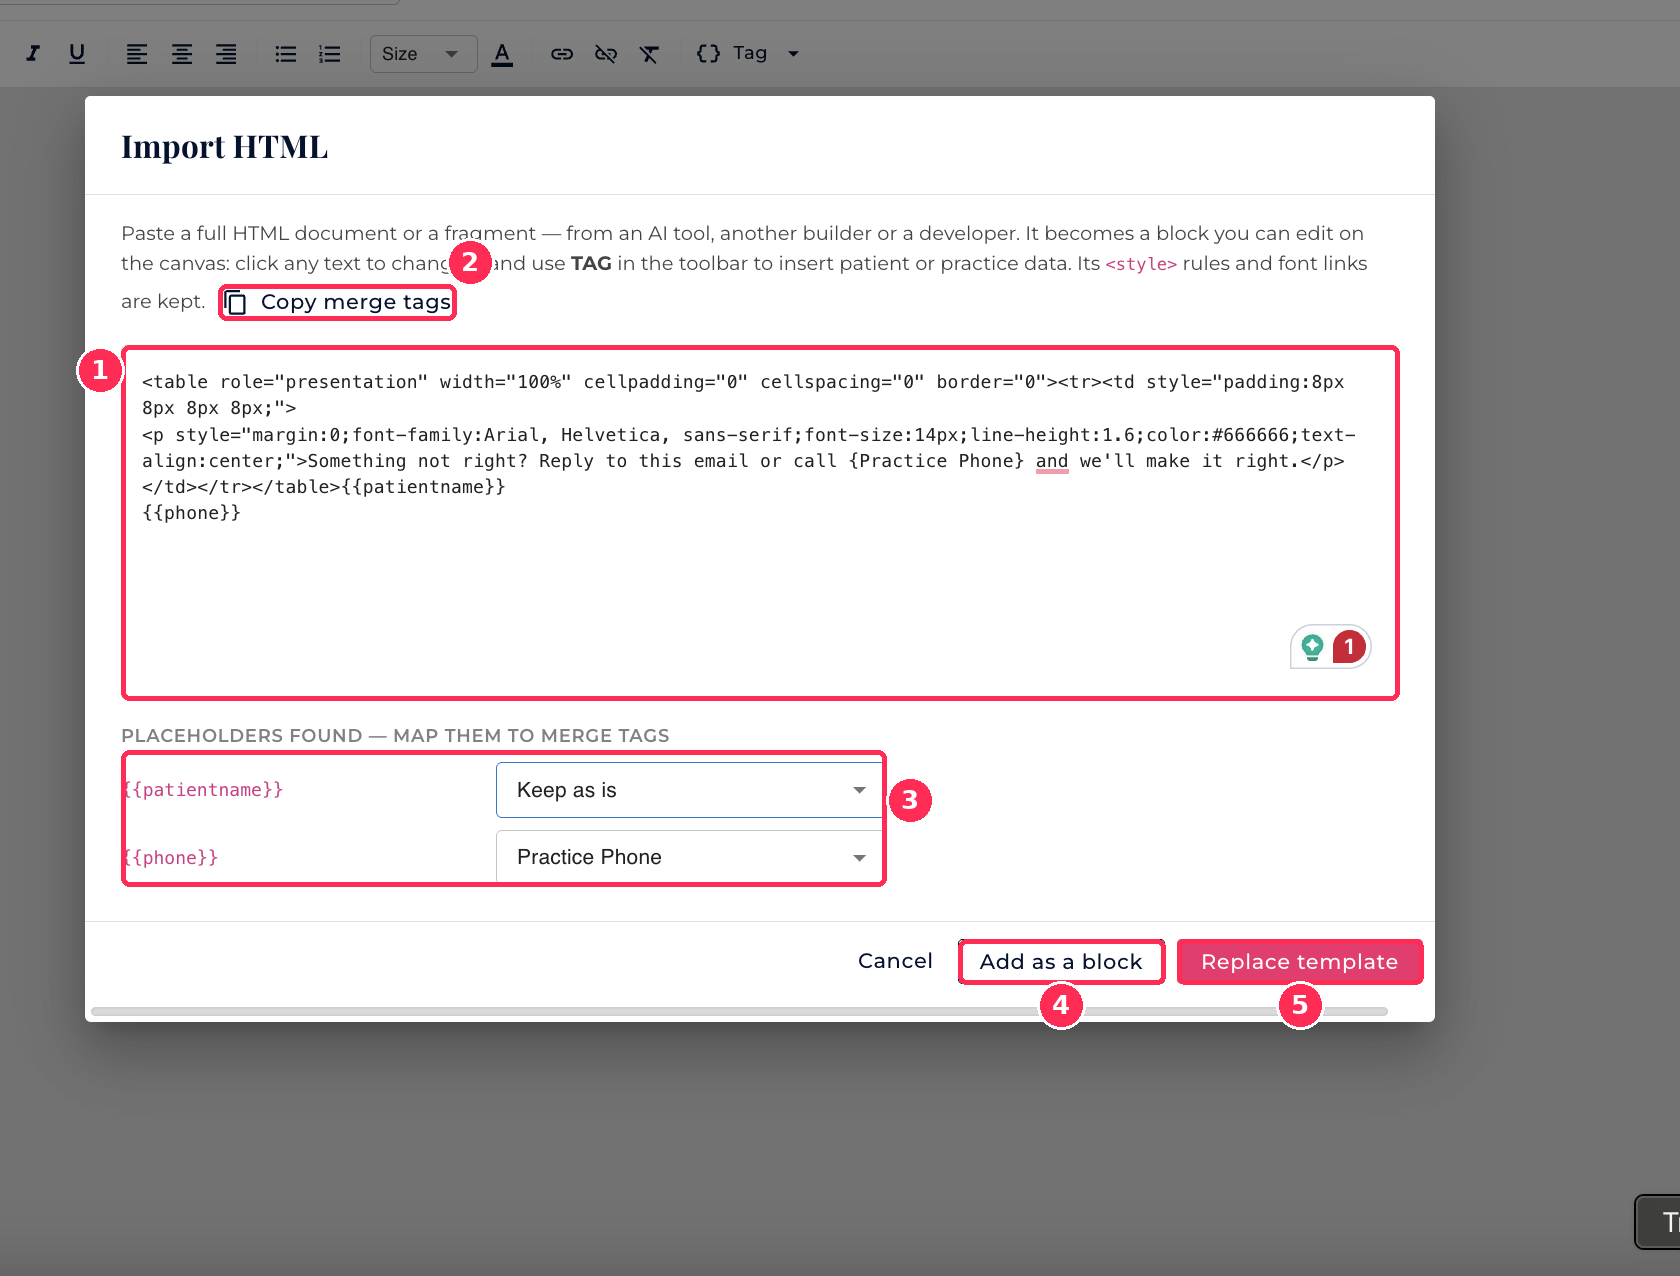
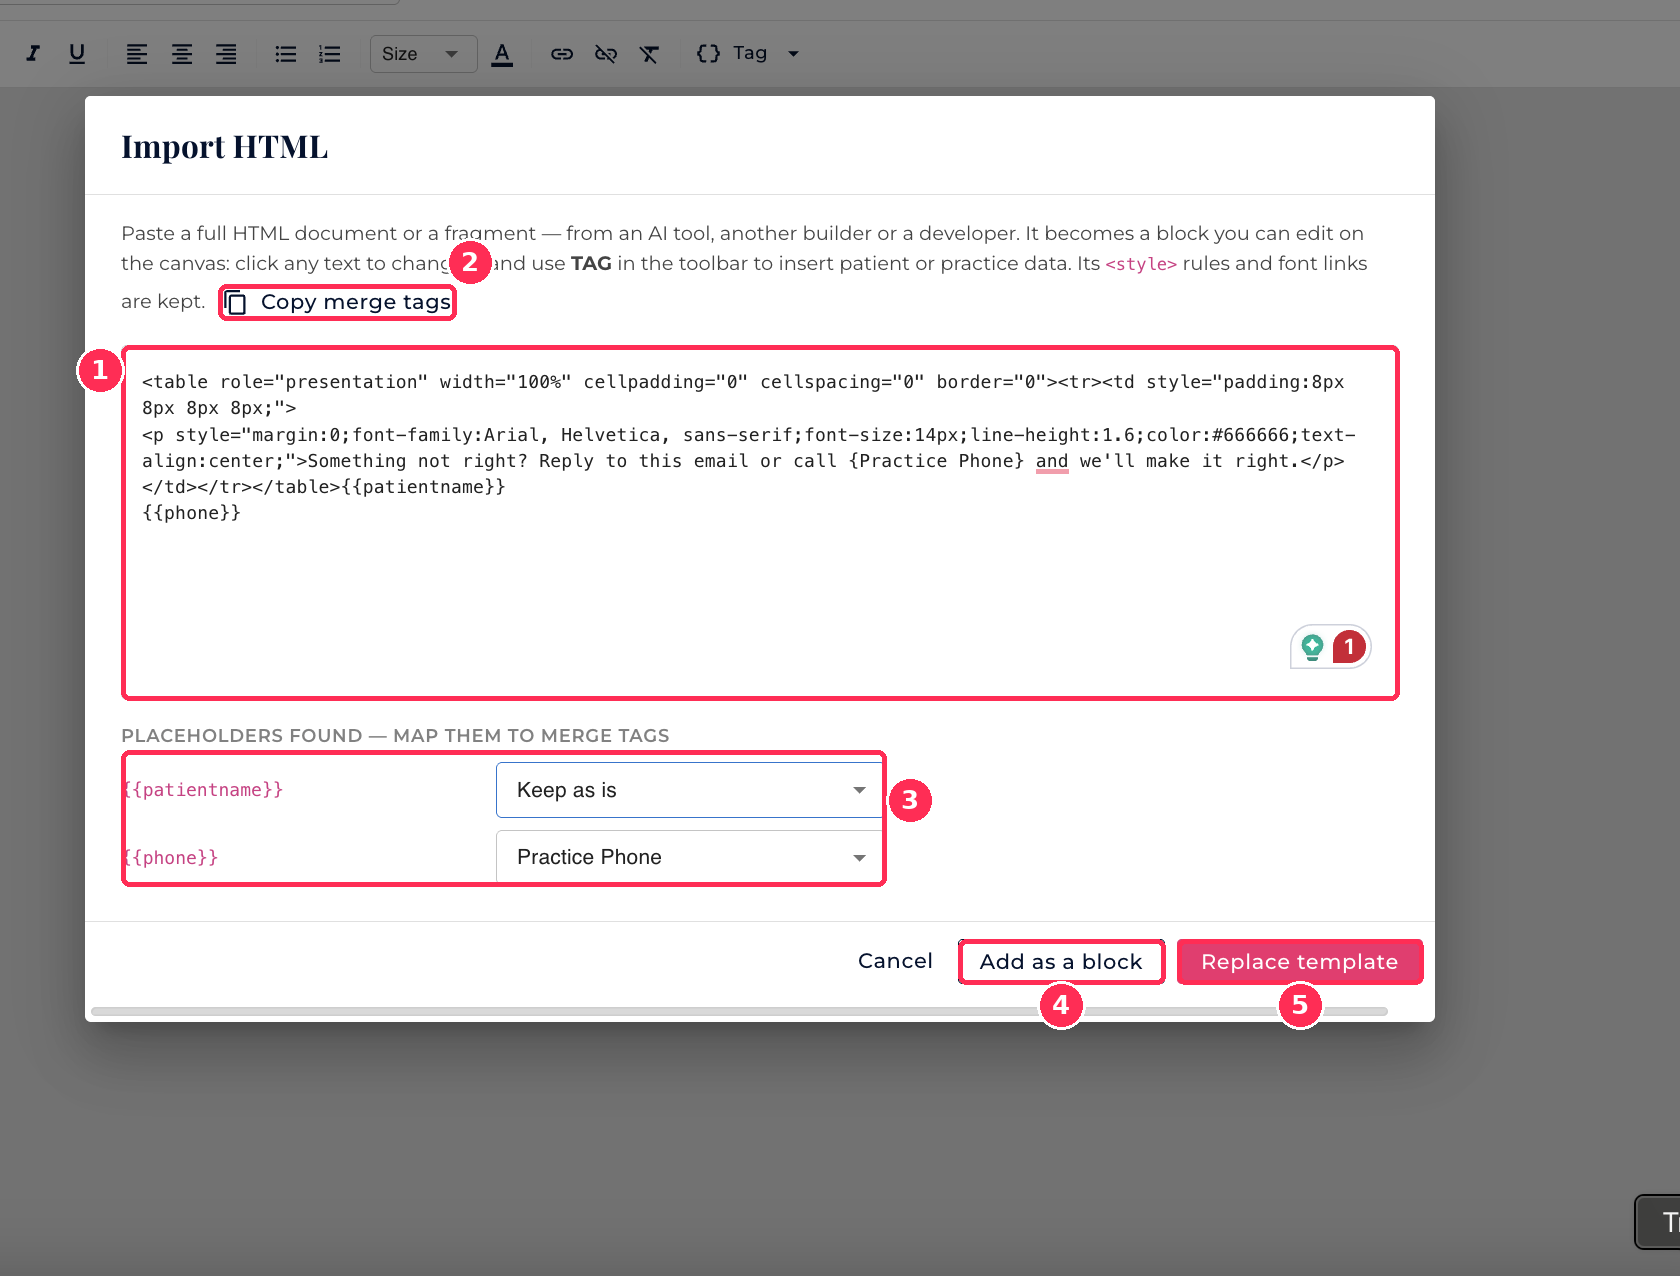
1. Code box. Paste your HTML code here.
2. Copy merge tags. Copies the list of Kasper merge tags so you can paste it into an AI tool or a document.
3. Placeholders found. If your code has words in double curly brackets, such as , each one appears here with a dropdown. Pick the Kasper information it should show, for example Practice Phone. Anything you leave on Keep as is stays as written.
4. Add as a block. Adds your code as a block in the row you selected. This is the one to choose.
5. Replace template. Replaces the whole template, including your Office Header and Footer. Avoid it unless you want to start over.
The import keeps your style rules and font links. Click any text in the block to edit it, and use Tag in the toolbar to insert patient or practice details. To see the full list of tags, click Copy merge tags in the Import HTML window.
Option B: Build with blocks
Click a block to add it, or drag it onto the canvas. You can use Text, Image, Button, Divider, Spacer, and HTML. When you select a text block, the toolbar lets you change bold, italic, underline, alignment, lists, size, color, and links, and insert merge tags.
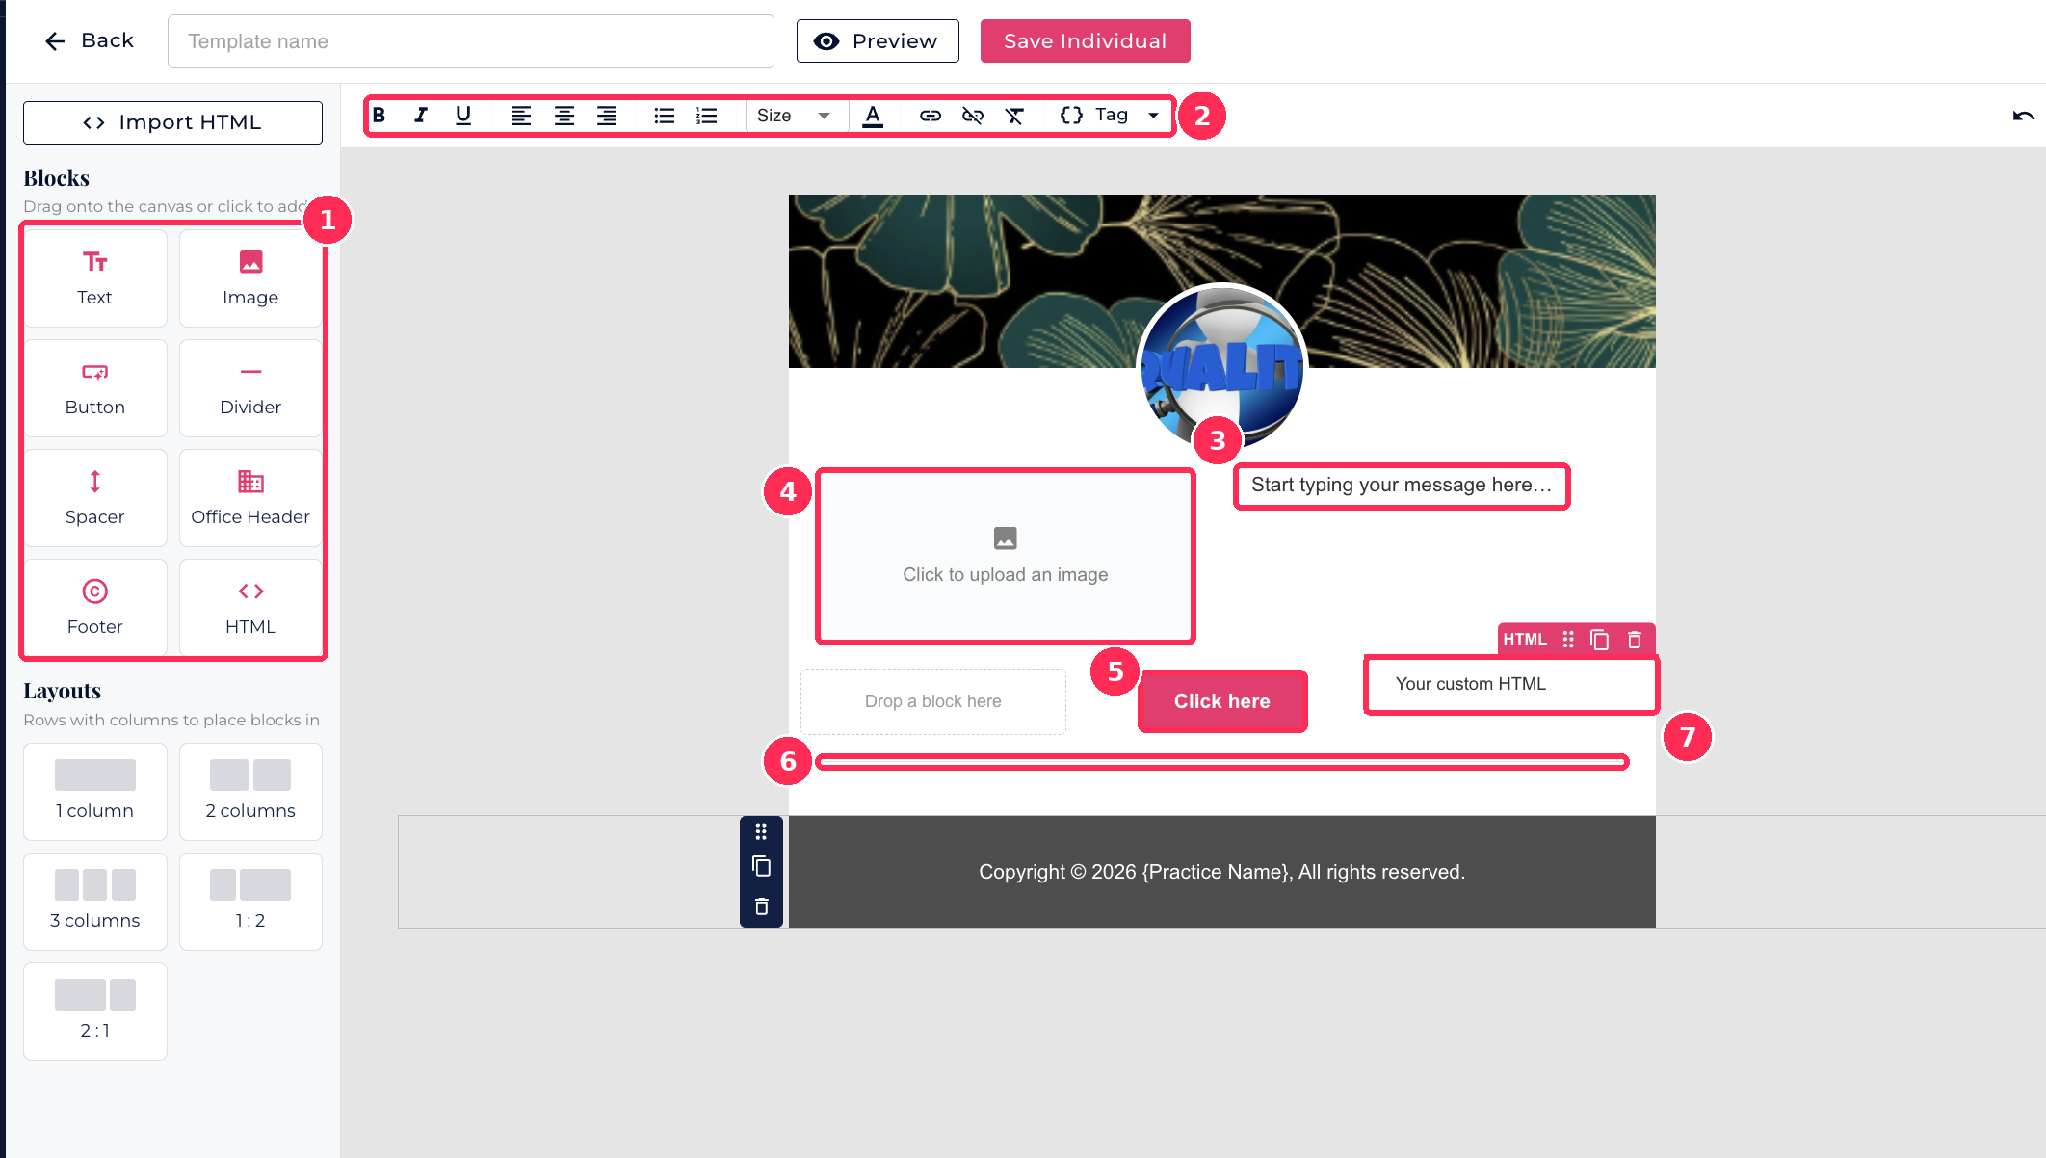
1. Blocks. Click a block to add it, or drag it into a column that says Drop a block here.
2. Text toolbar. Appears when you click a text block. Use it for bold, italic, underline, alignment, lists, size, color, links, and Tag to insert patient or practice details.
3. Text block. Click it and type your message.
4. Image block. Click Click to upload an image to add a picture.
5. Button block. Click it to change the button text and link.
6. Divider. A thin line that separates sections.
7. HTML block. Click it to add your own code. Its toolbar lets you move, duplicate or delete it.
Button settings
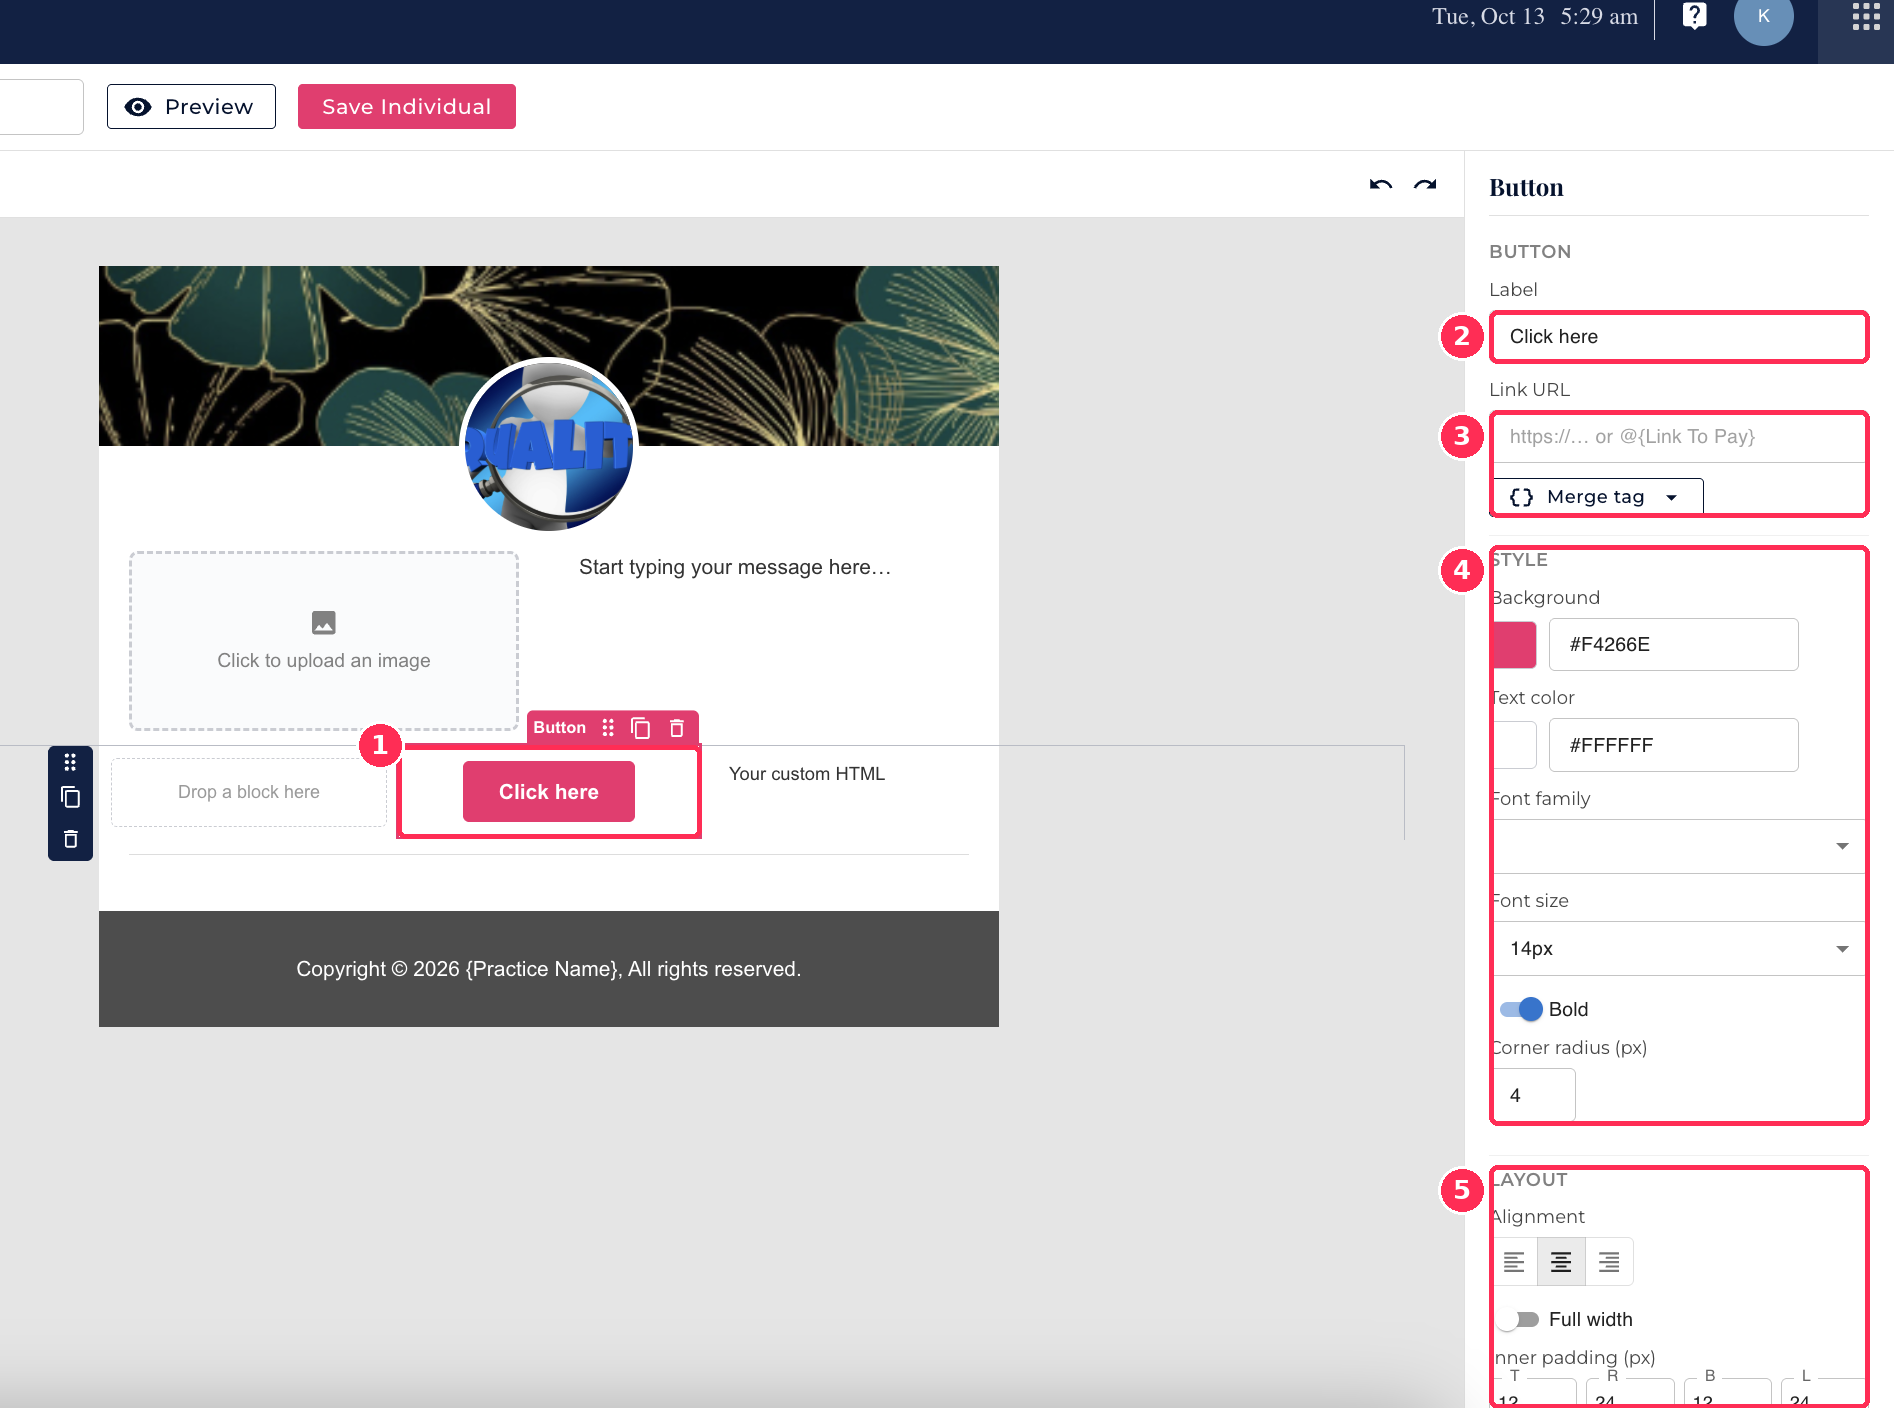
1. Button block. Click it on the canvas to open its settings.
2. Label. The words on the button, such as "Book my visit."
3. Link URL. Where the button goes. Paste a web address, or use Merge tag to insert a link such as the payment link.
4. Style. Change the Background color, Text color, Font family, Font size, Bold, and Corner radius (a higher number gives rounder corners).
5. Layout. Set the Alignment, turn on Full width to stretch the button across the column, and adjust the Inner padding.
HTML block settings
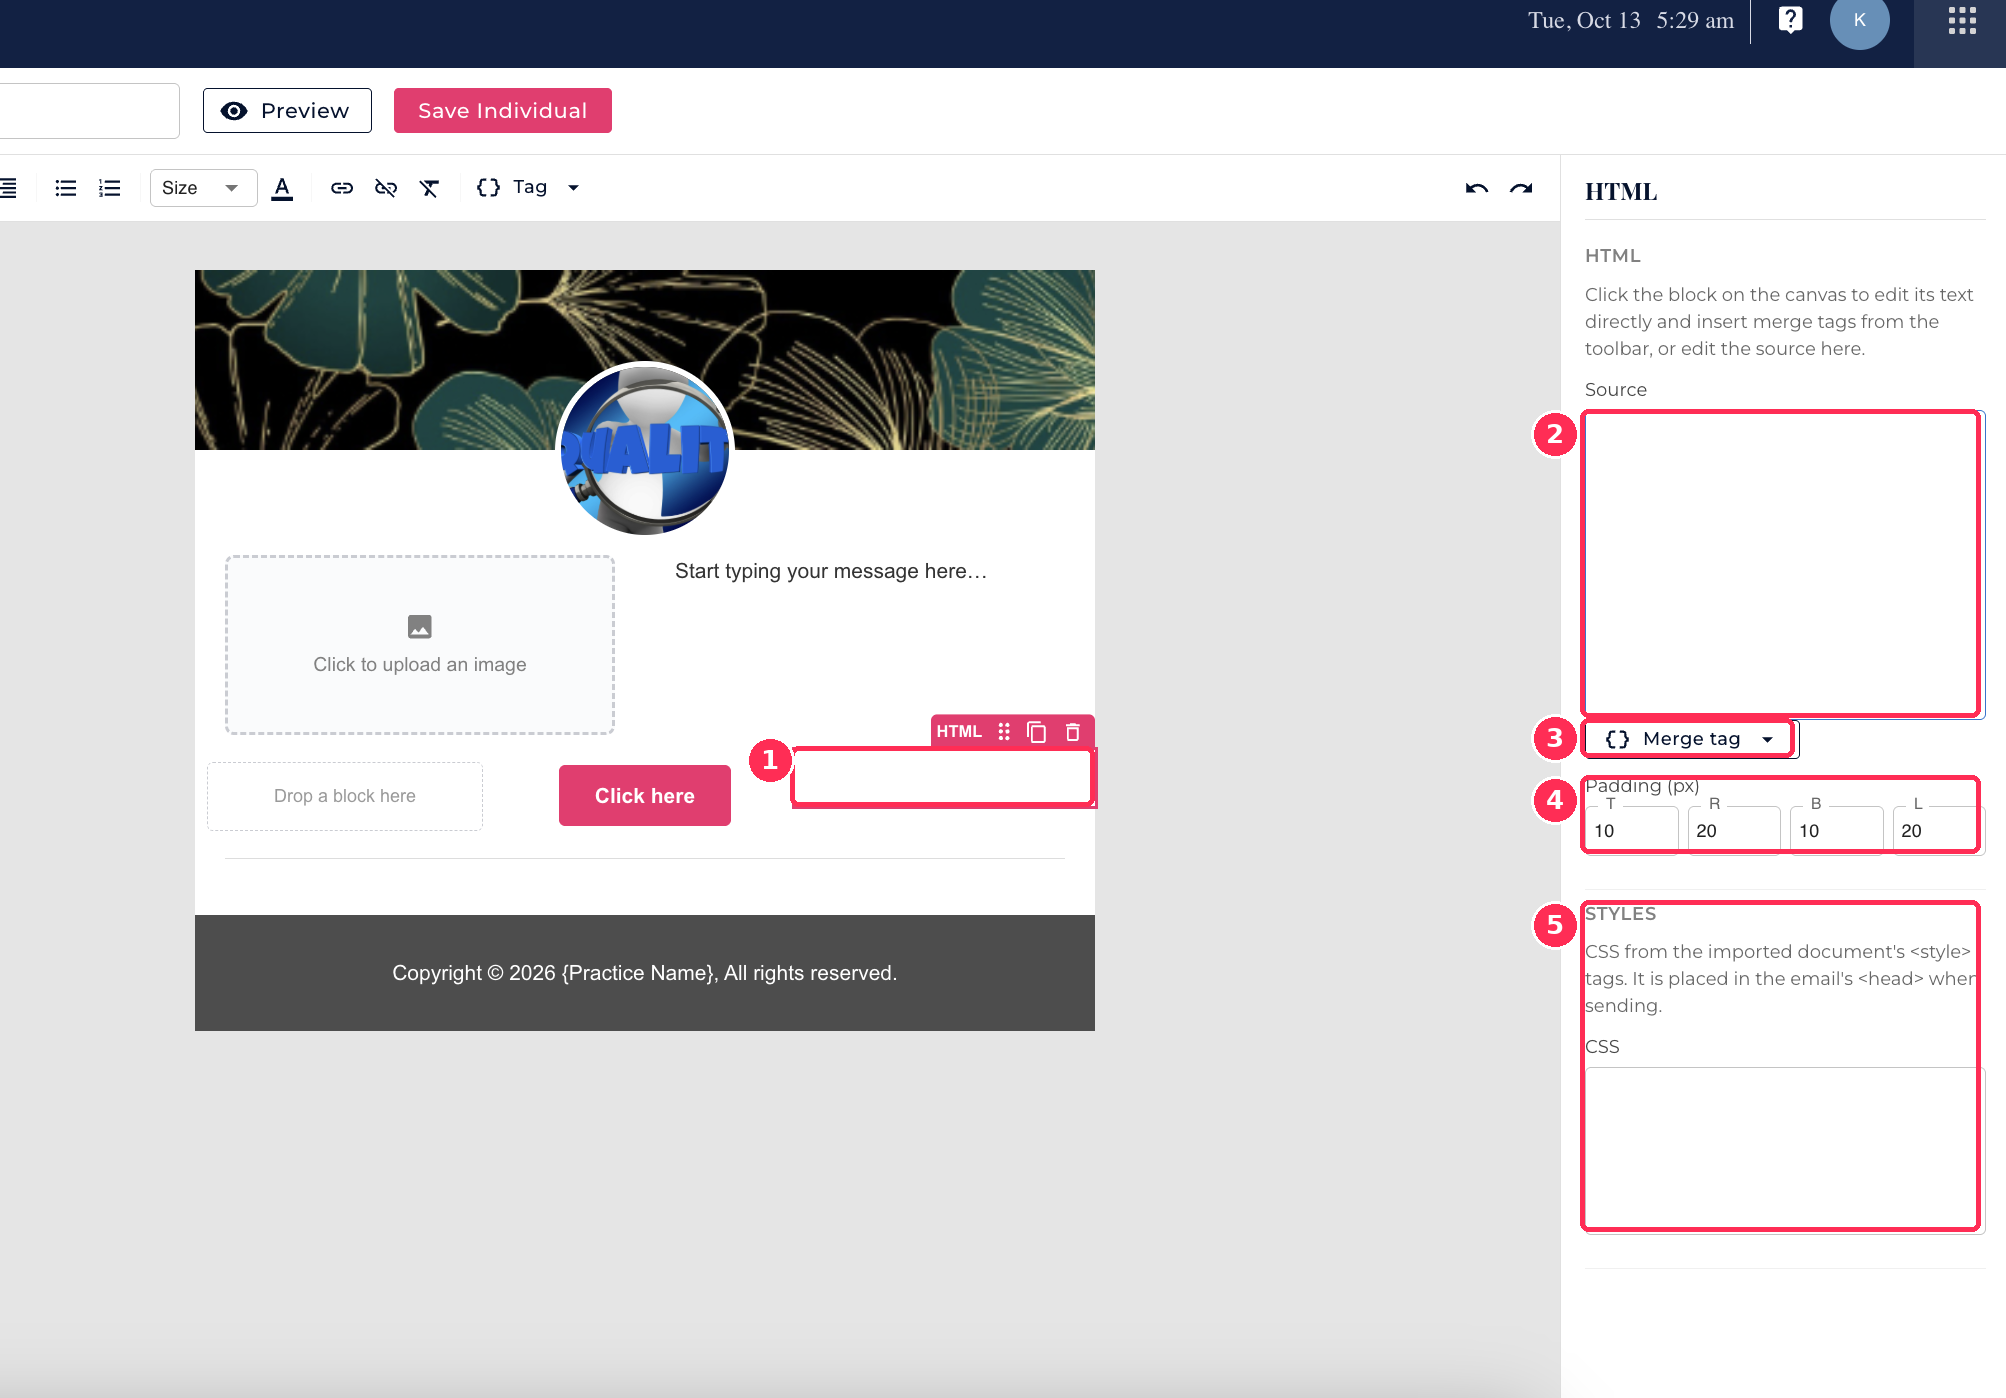
1. HTML block. Click it on the canvas to edit its text directly. Use Tag in the toolbar to insert merge tags.
2. Source. Paste or edit the block's HTML code here.
3. Merge tag. Inserts a merge tag into the source at your cursor.
4. Padding. Space around the block (top, right, bottom, left).
5. Styles (CSS). Style rules that came with imported code are kept here. You only need this if your code uses them.
Part 4: Add an image
13. Click Image in the Blocks section. A box that says Click to upload an image appears. Move it above your text if needed.
14. Click Click to upload an image and choose your file.
15. With the image selected, the right panel lets you set:
• Alt text: a short description for people who cannot see the image
• Link (optional): where the image goes when clicked
• Width (%), Alignment, and Padding
• Replace image: swap in a different image any time
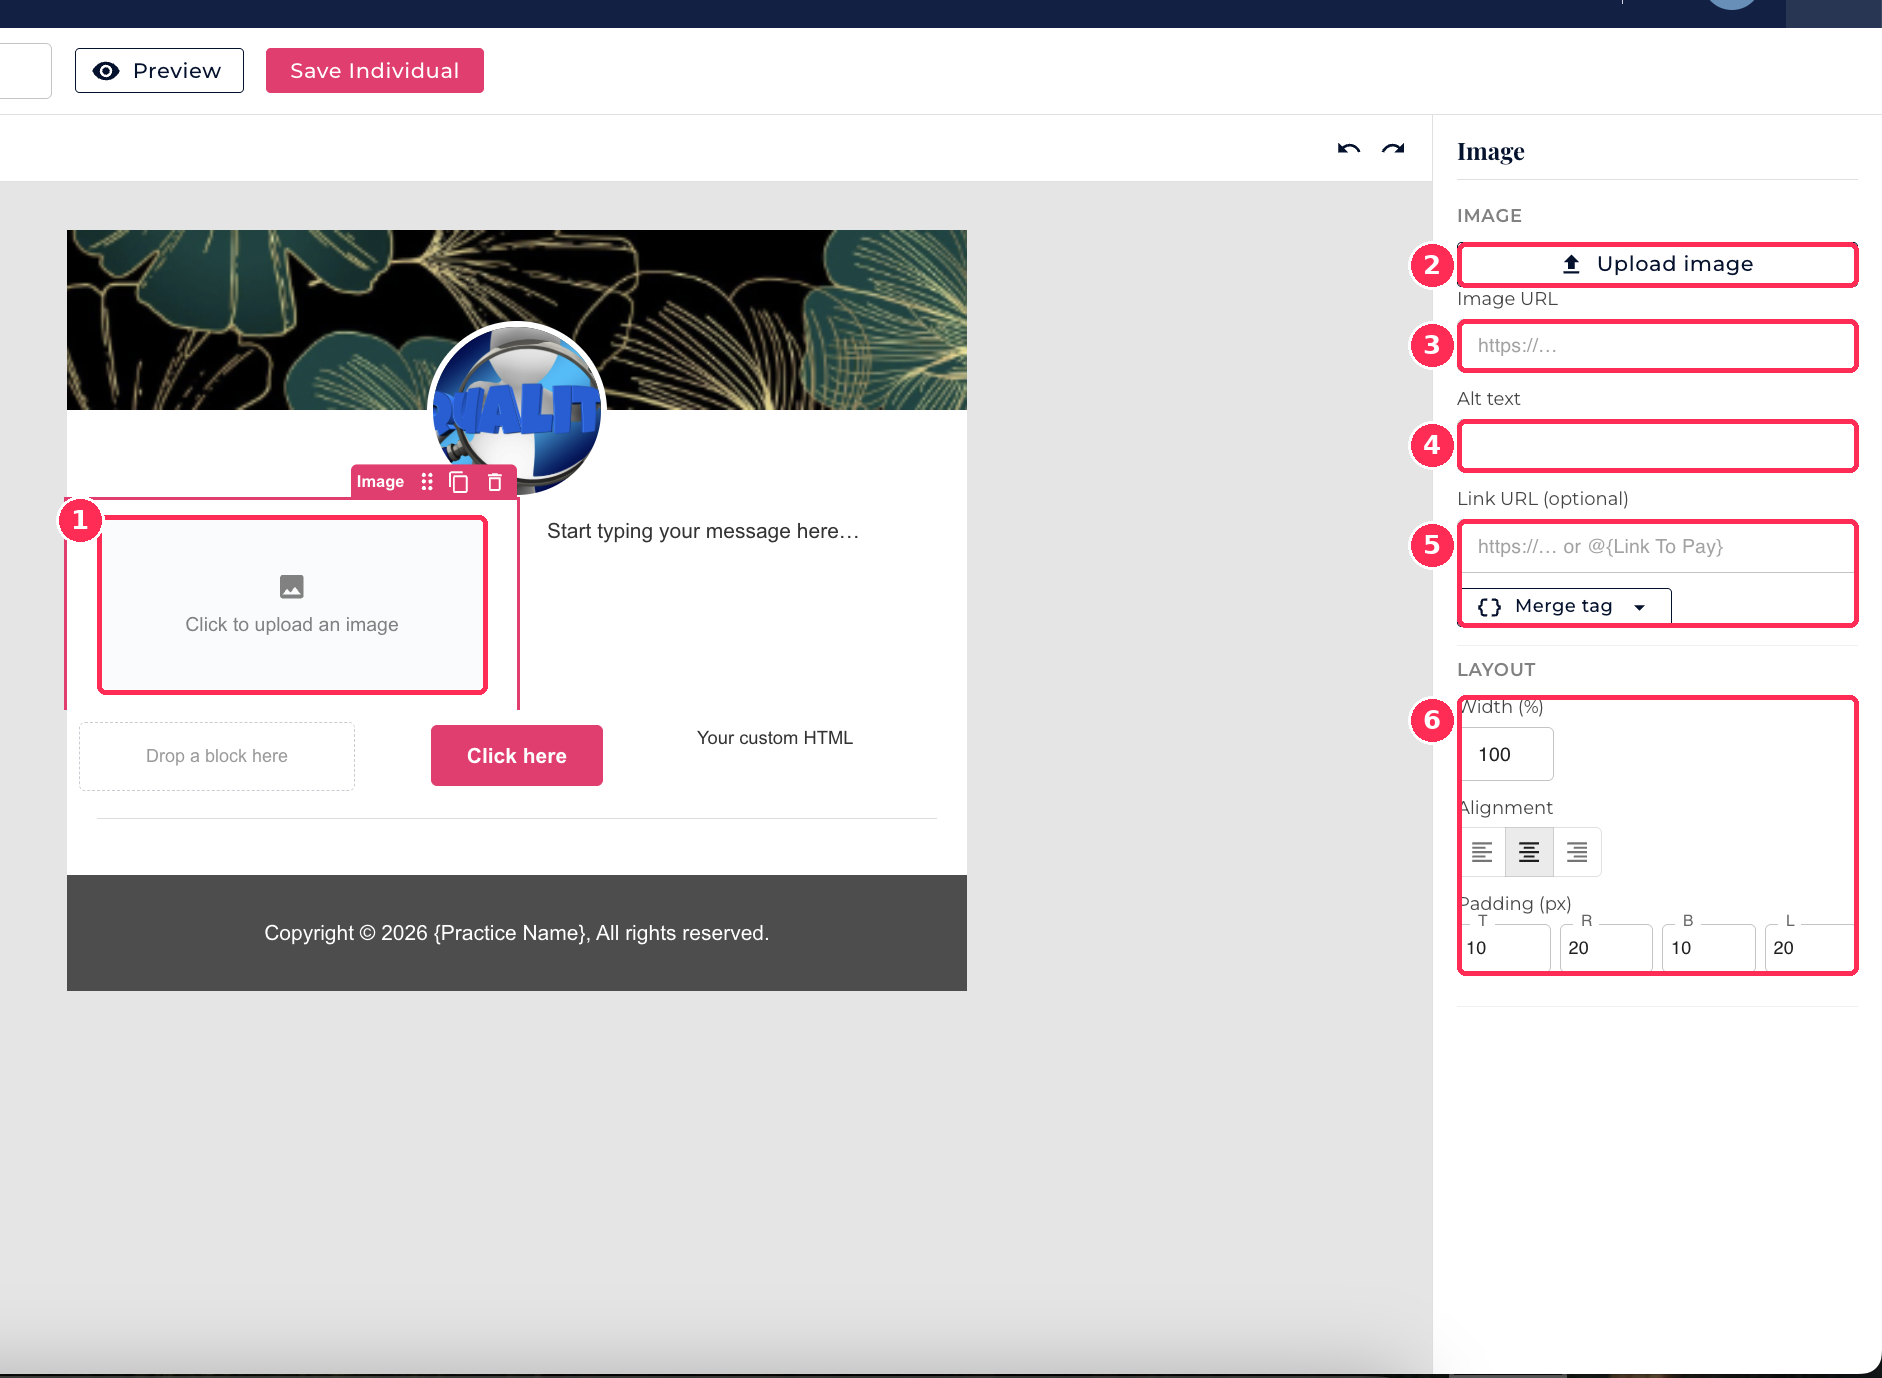
1. Image block. Click it to select it and open its settings.
2. Upload image. Choose a PNG or JPG from your computer.
3. Image URL. Or paste a web address for an image that is already online.
4. Alt text. A short description of the image.
5. Link URL (optional). Where patients go when they click the image. Use Merge tag to insert a link such as the payment link.
6. Layout. Set the image Width (%), Alignment (left, center or right) and Padding (top, right, bottom, left).
Part 5: Save your template
16. Click Save Individual.
17. A window explains that your template is saved as the Individual version, the email a single patient receives. Next you will adjust a copy for the Family version. Click Save & continue to Family.
18. Click Got it, review the Family wording (see the next section), then click Save Family.
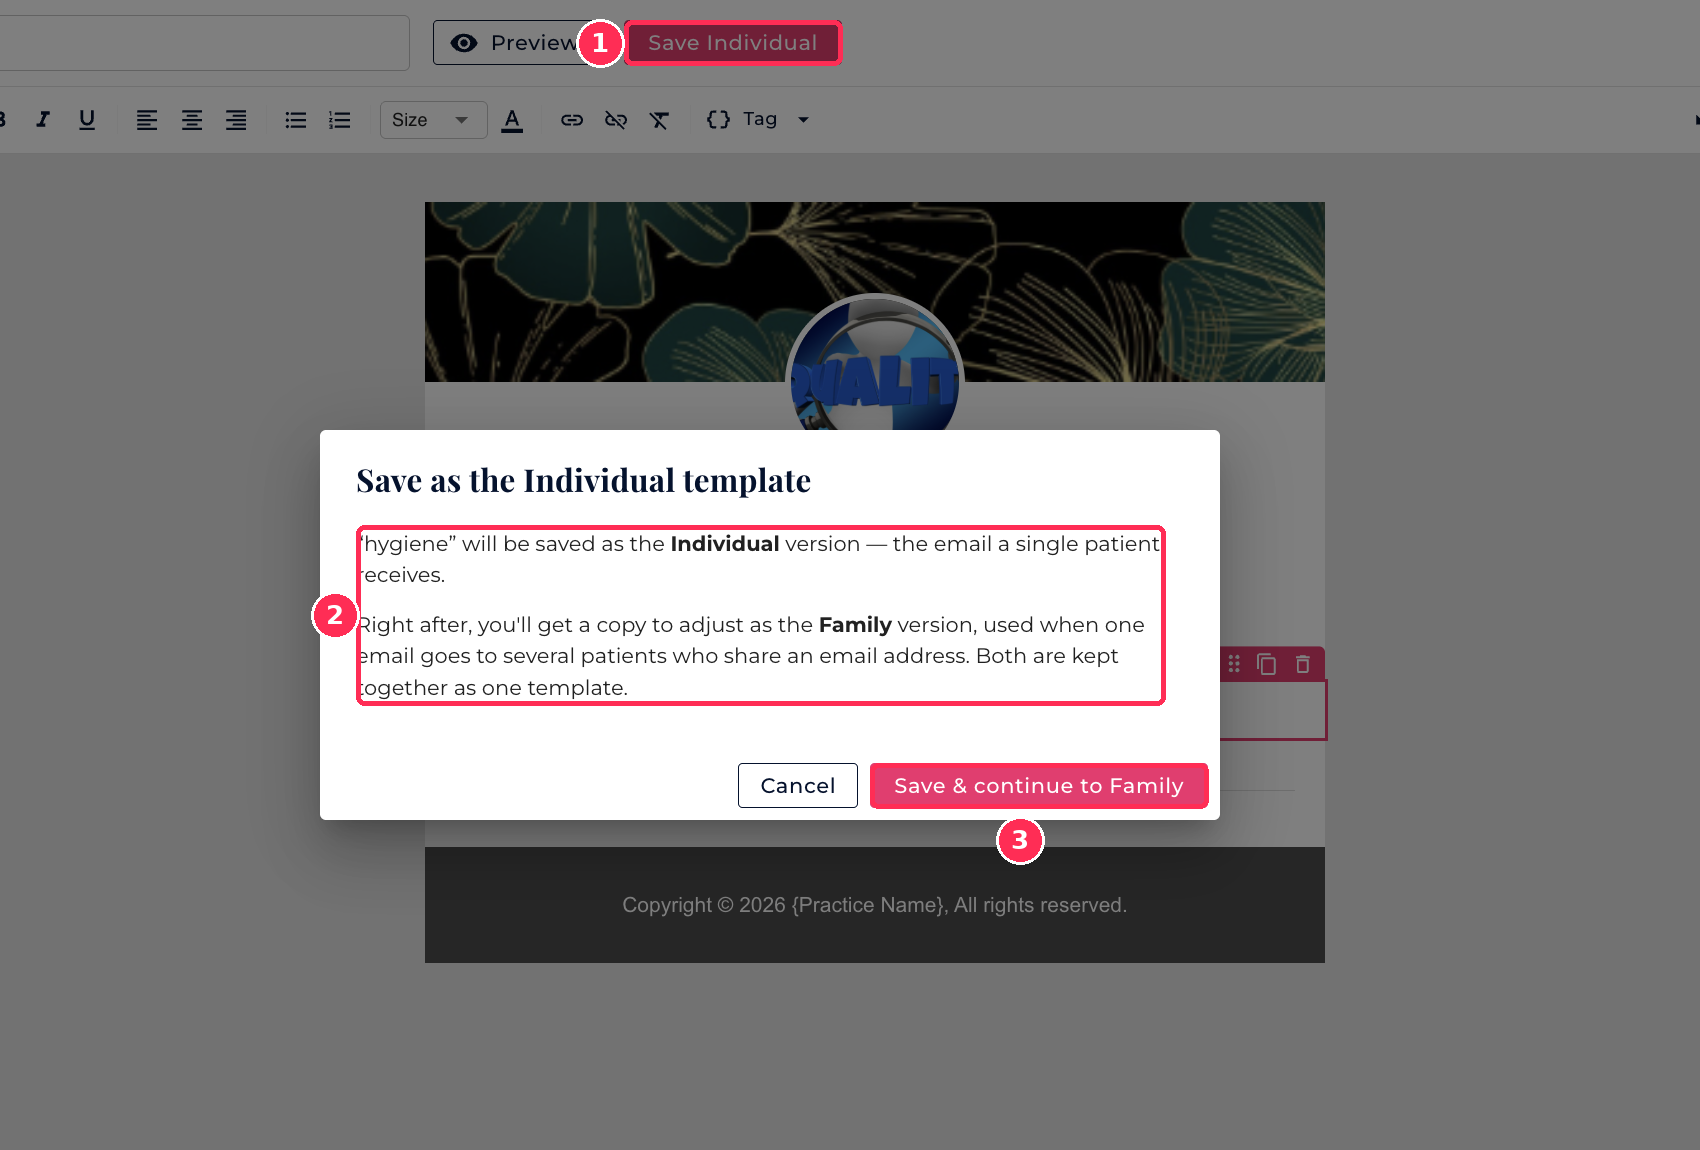
1. Save Individual. Click it at the top of the builder.
2. What the window says. Your template is saved as the Individual version, the email a single patient receives. You then get a copy to adjust as the Family version, and both are kept together as one template.
3. Save & continue to Family. Click it to move on. Cancel takes you back to the builder.
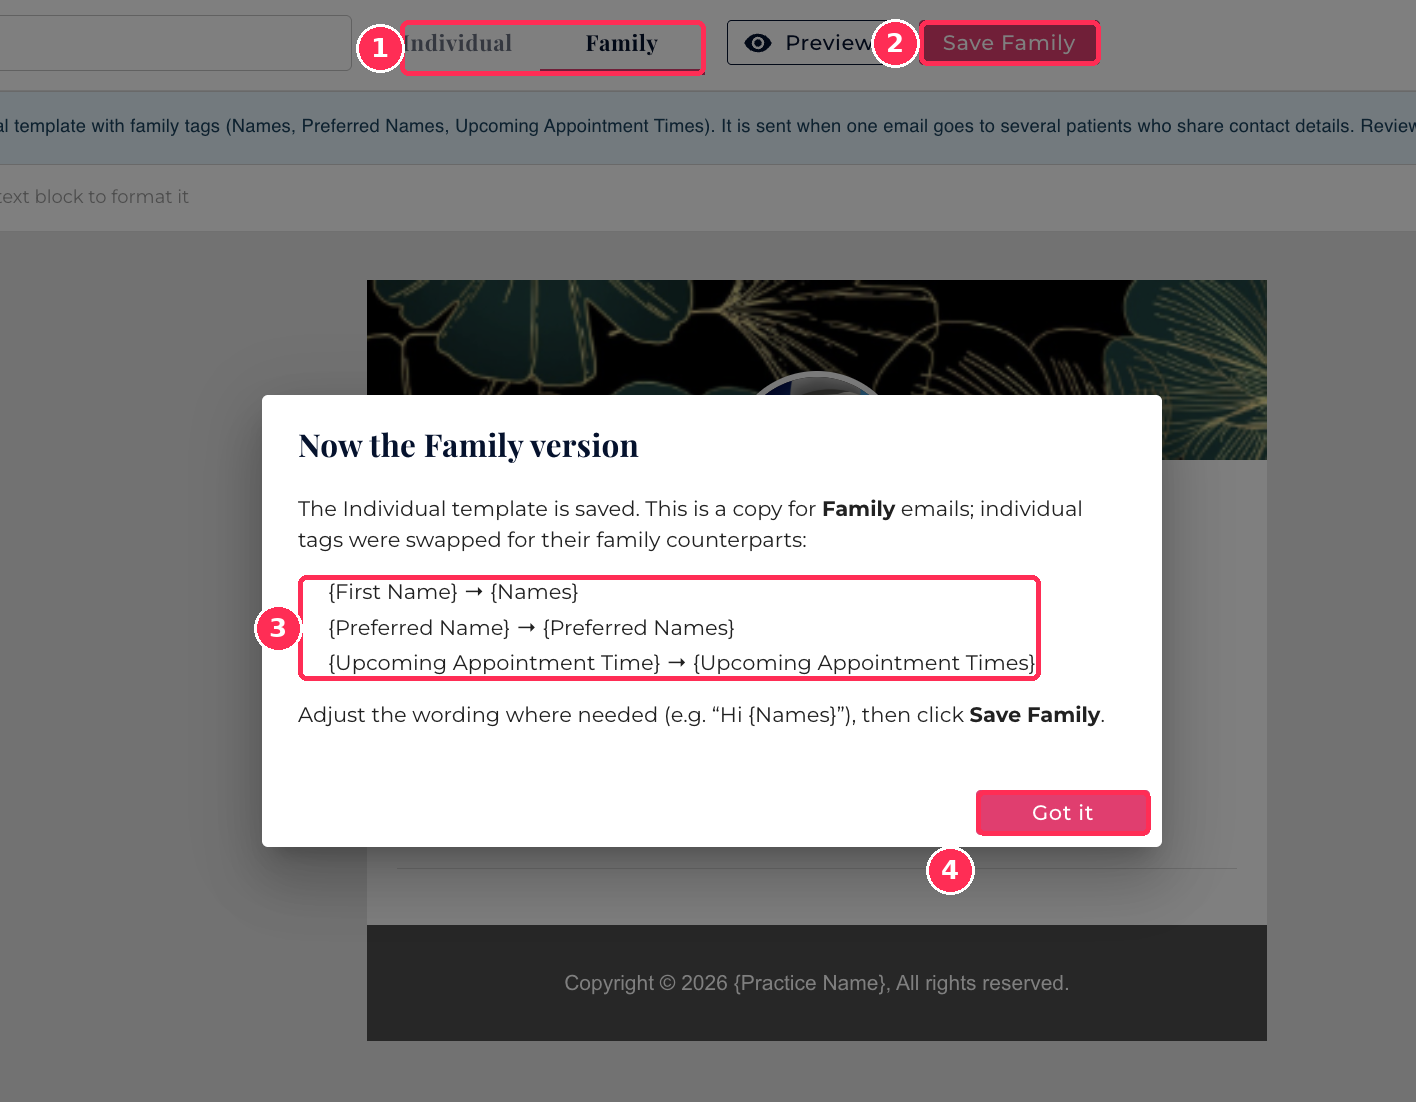
1. Individual and Family tabs. Use them to switch between the two versions.
2. Save Family. Click it after you have checked the Family wording.
3. Tag swaps. The window lists the tags that were changed for the Family version.
4. Got it. Click it to close the window and edit the Family version.
Import an email design made with AI
You can ask an AI tool such as ChatGPT, Claude or Gemini to design an email for you. It gives you a block of text called HTML code. Think of it as the email's recipe. You do not need to understand it. You only copy it and paste it into Kasper.
Step 1: Ask the AI for your email
Open your AI tool, copy the message below, change the parts in brackets, and send it.
Create an HTML email for a dental office. The email is a [reminder for patients who are overdue for their cleaning].

Rules:
- Friendly, warm tone. Keep it short.
- Use a colour scheme of [teal and white].
- Include a big button that says [Book my visit]. The button must link to [paste your scheduling link here].
- Wherever the email needs a patient or office detail, use a placeholder in DOUBLE curly brackets with a plain name, like ,  and . Do not use any other bracket style.
- Make it 600 pixels wide and easy to read on a phone.
- Do not add a header with a logo or a footer. My email tool adds those.
- Give me the complete code in one code box that I can copy.
Tips for better results:
• If you do not like the result, reply with what to change, such as "make the button bigger" or "use shorter wording."
• Kasper detects every placeholder written in double curly brackets, such as , and lets you match it to Kasper's own information in Step 5. The AI can name them anything, but plain names like are easiest to match.
• Paste your office's real scheduling link into the prompt, where it says [paste your scheduling link here]. The AI builds it into the button, so the code comes back ready to use.
Step 2: Copy the code
1. Look for the box with the code. It usually has a Copy button in the top right corner. Click it.
2. No Copy button? Click inside the code box, select everything with Cmd + A (Mac) or Ctrl + A (Windows), then copy with Cmd + C (Mac) or Ctrl + C (Windows).
You can go straight to Step 4 now. Step 3 is optional and saves a copy of the code on your computer in case you want it later.
Step 3 (optional): Save the code in a text file
On a Mac
1. Open TextEdit. Press Cmd + Space, type TextEdit and press Enter.
2. In the top menu, click Format, then Make Plain Text. This step is important.
3. Paste the code with Cmd + V.
4. Click File, then Save. Name it something like recall-email.html and click Save. If it asks about .txt or .html, choose Use .html.
On Windows
1. Open Notepad. Click the Start menu, type Notepad and press Enter.
2. Paste the code with Ctrl + V.
3. Click File, then Save As.
4. Set Save as type to All files. Name it something like recall-email.html and click Save.
To get the code back later, open the file with TextEdit (Mac) or Notepad (Windows), not your web browser. Right-click the file, choose Open With, then pick TextEdit or Notepad. Select everything and copy it again. On a Mac, if you see a finished email instead of code, open TextEdit, click TextEdit, then Settings, and under Open and Save turn on Display HTML files as HTML code.
Step 4: Paste the code into Kasper
1. Open your template in the builder. Make sure your Office Header and Footer are already there (see Part 2).
2. Click the empty Drop a block here row between them.
3. Click Import HTML at the top of the left panel.
4. Click inside the large box and paste. On a Mac press Cmd + V. On Windows press Ctrl + V.
5. Look below the box for Placeholders found. Each word the AI wrote in double curly brackets is listed there. Follow Step 5 to match them. If nothing is listed, skip to the next step.
6. Click Add as a block. Do not choose Replace template, if you are using a header and footer.
7. If the new block lands below the footer, use the handle on the left of its row to move it up.
Step 5: Match the placeholders to Kasper
This happens in the same window, before you click Add as a block. Under Placeholders found, map them to merge tags, every placeholder from the AI's code appears in a row, for example or . Each row has a dropdown that says Keep as is.
1. Click the dropdown next to a placeholder.
2. Choose the Kasper information it stands for. For , choose First Name under Patient.
3. Repeat for every row.
4. Click Add as a block.
The dropdown groups Kasper's information like this:
|
Group |
Choices |
|
Patient |
First Name, Last Name, Preferred Name, Remaining Benefits |
|
Practice |
Practice Name, Practice Phone, Today's Date |
|
Appointment |
Upcoming Appointment Date, Upcoming Appointment Time |
|
Links & Forms |
Link To Pay, Paperless Forms Link |
Two other choices appear at the top. Keep as is leaves the placeholder untouched. Type a value... lets you enter your own text instead.
If the AI used a different name, such as , it still works. Just pick the matching choice in the dropdown. After you import, Kasper replaces each placeholder with the choice you picked, and the email fills in each patient's details when it is sent.
Step 6: Check your email
• Click through the text and fix any wording you want to change.
• If a button still has the wrong link, click the button and paste your office's real link.
• Add your banner or photo with an Image block (see Part 4).
• Click Preview and look at the desktop and mobile views. Merge tags show sample details, such as a sample first name, until the email is sent.
• Save your template (see Part 5).
If something looks wrong, go back to your AI chat and describe the problem in plain words, such as "the button is too small on a phone." Paste the new code and import it again, using Add as a block.
Individual and Family versions
Every template is saved twice, so it reads correctly whether one patient or several patients in the same household receive it.
• Individual is sent to one patient. This is the version you build first.
• Family is sent when one email address covers more than one patient. Kasper creates it from your Individual version, then you review the wording.
When you switch to the Family version, these merge tags are swapped automatically:
|
Individual tag |
Family tag |
|
{First Name} |
{Names} |
|
{Preferred Name} |
{Preferred Names} |
|
{Upcoming Appointment Time} |
{Upcoming Appointment Times} |
Manage your templates
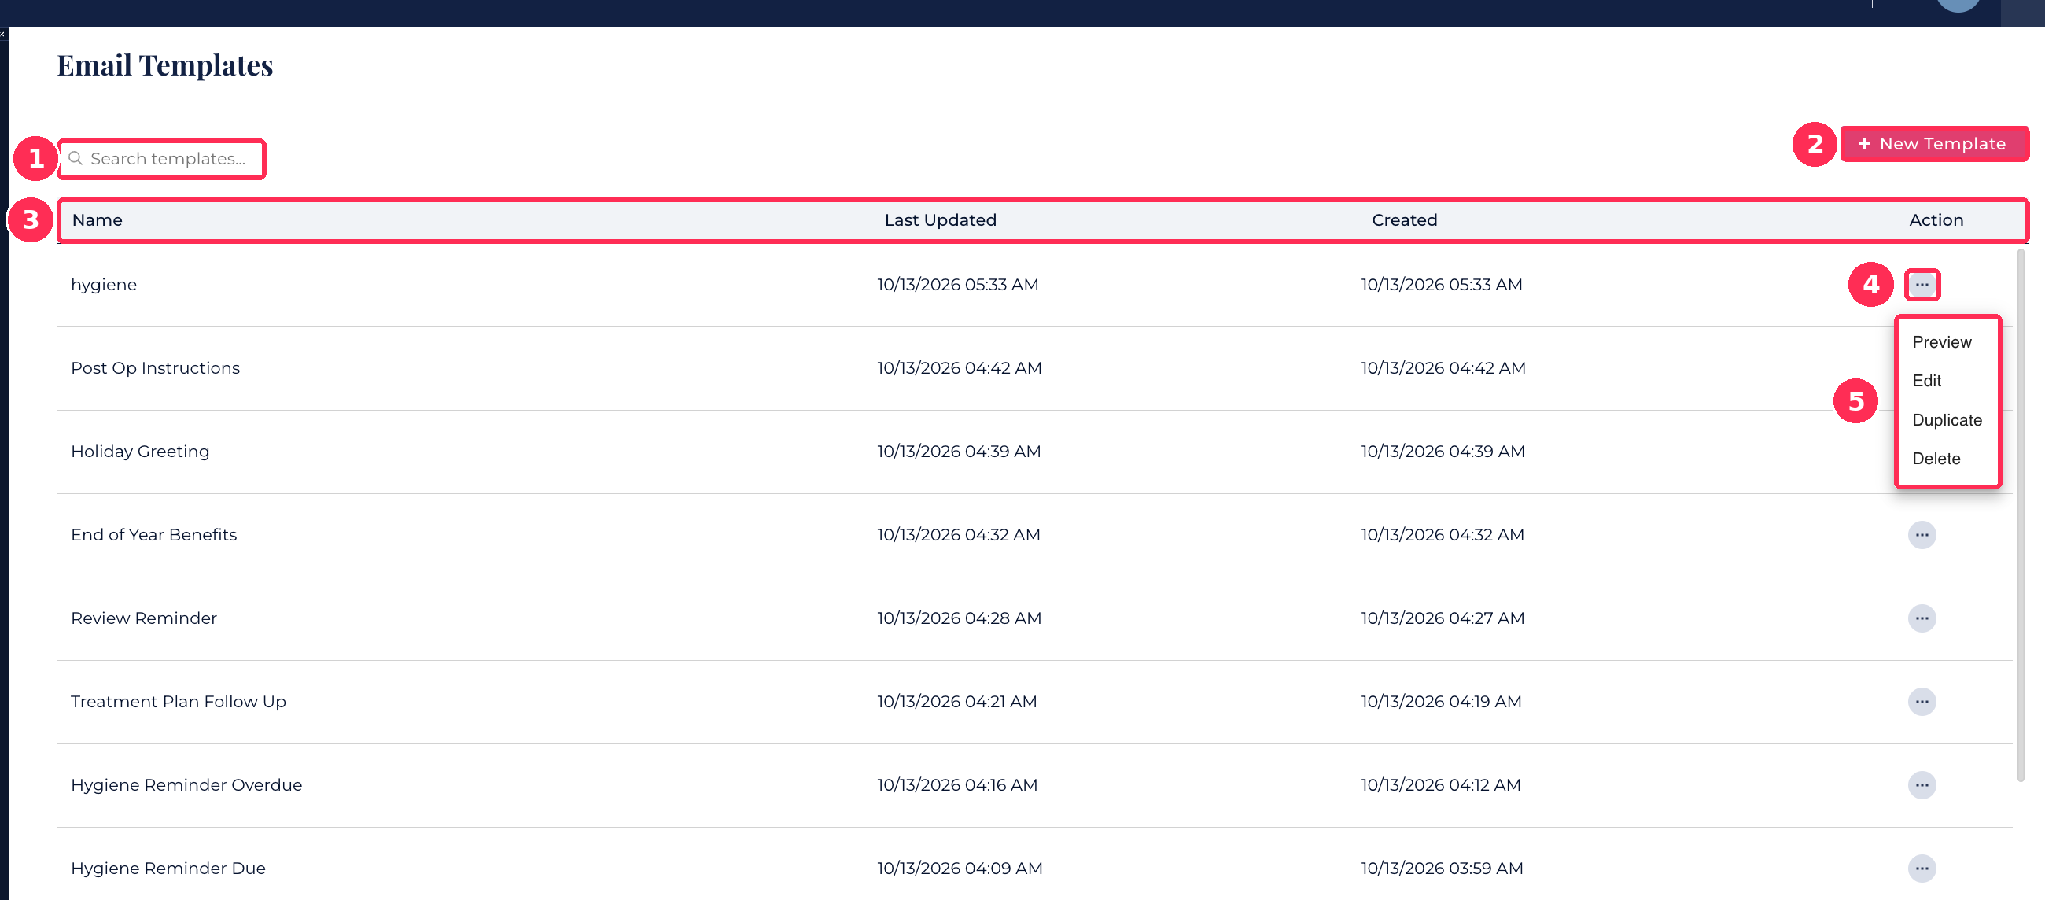
Open Email Templates to see every template with its Name, Last Updated and Created date. Use the Action menu (three dots) on any row:
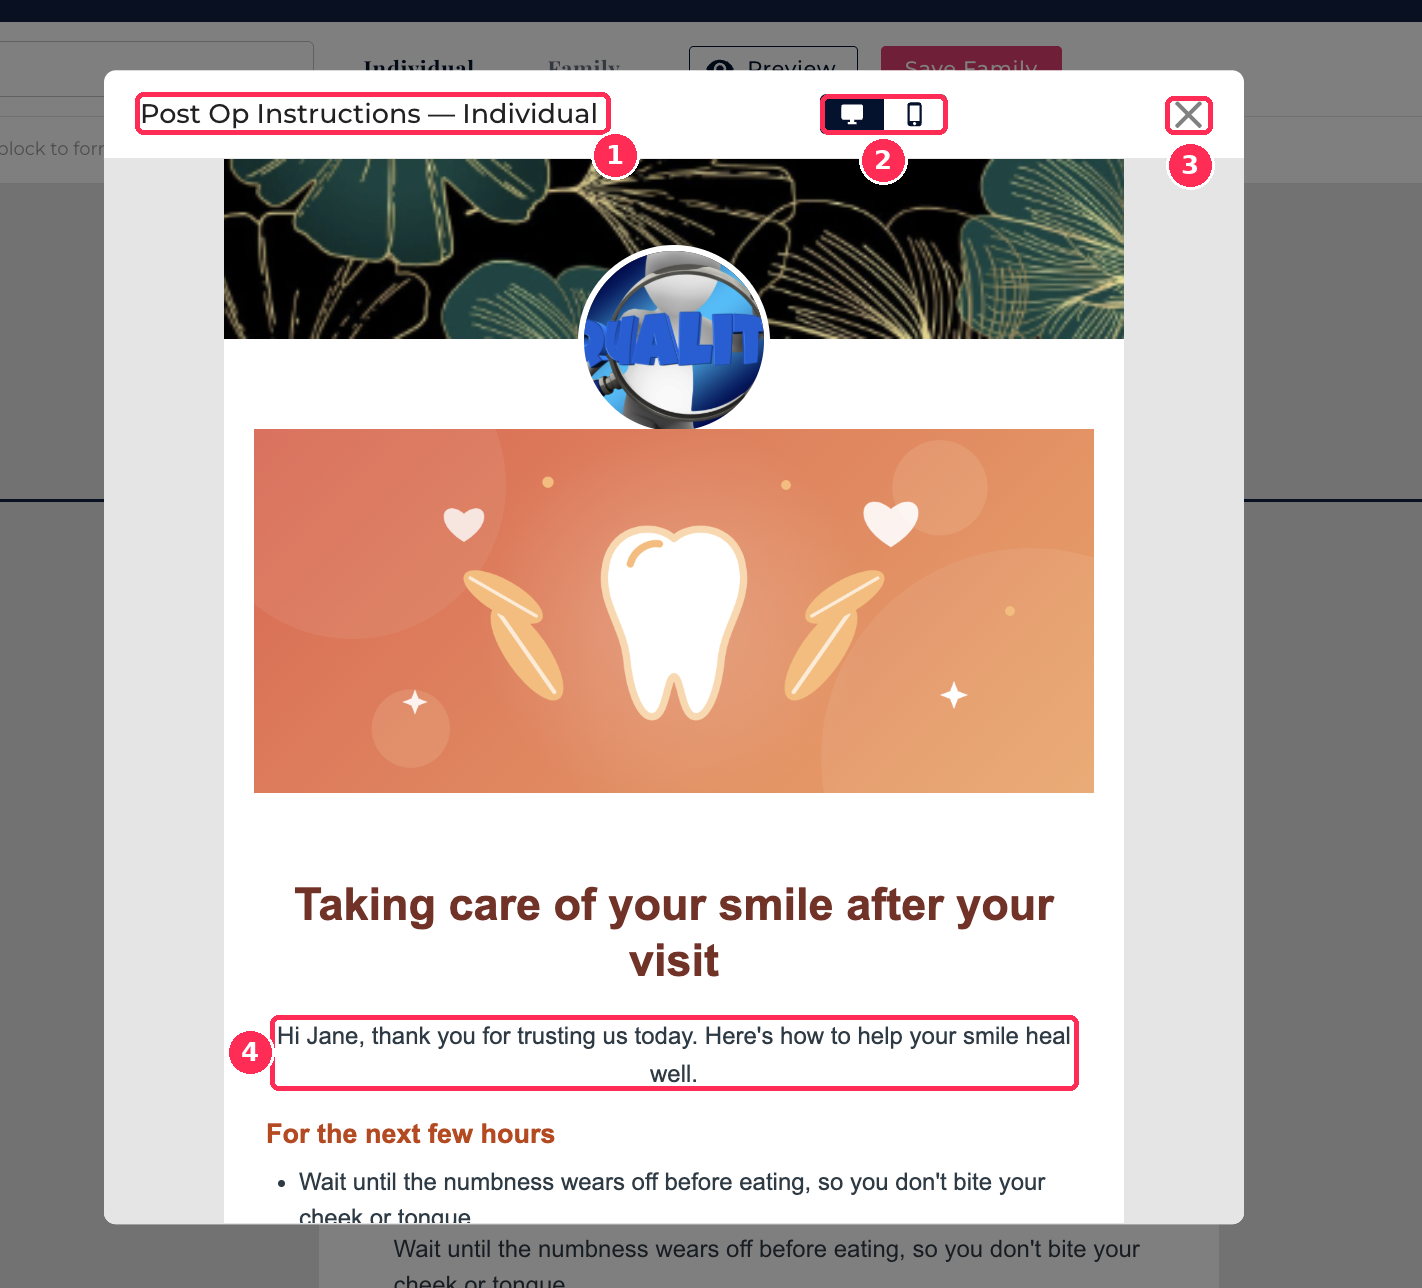
• Preview shows the email as patients will see it, with a desktop and mobile toggle.
• Edit reopens the builder so you can change blocks, wording or images.
• Duplicate makes a copy you can rename and adjust. This is the quickest way to make a seasonal version of a template you already like.
• Delete removes the template.
Preview your template
You can also click Preview at the top of the builder while you work. It opens the version you are editing, Individual or Family.
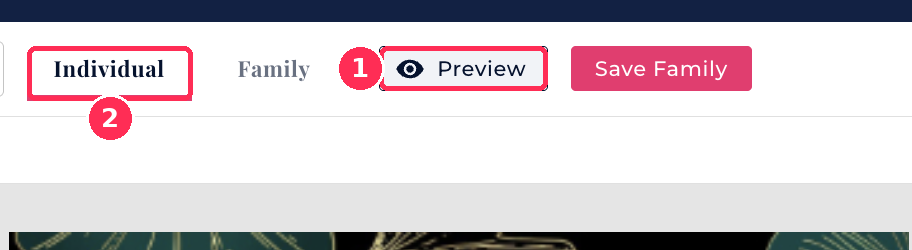
1. Preview. Click it to see your email as patients will see it.
2. Individual and Family tabs. Preview shows whichever version is selected.
Tips and troubleshooting
• Always preview on mobile. Use the mobile toggle in Preview to confirm columns stack and buttons stay readable.
• Choose "Add as a block" when importing HTML. "Replace template" wipes the whole template, including your Office Header and Footer.
• Header or footer showing twice? Your HTML probably includes its own. Delete that part of the code, or remove the extra Office Header or Footer block.
• Logo missing in the header? The Office Header pulls the cover image, logo and name from your Brand Customization settings. Update them there.
• Change a button link. For a Button block, click it and edit the Link URL in the right panel. For a button inside an HTML block, open the HTML block, switch to the Source panel and edit the link address (href). Keep merge tags exactly as written.
• Need a tag? In the Import HTML dialog, use Copy merge tags to copy the full list, or use the Tag dropdown in the toolbar while editing text.
• Images. Upload banners in an Image block rather than inside imported HTML, and always fill in Alt text. A banner about 1200 x 520 px looks sharp in a 600 px email.
• Preview shows sample details. Merge tags such as {First Name} show a sample name, so use Preview to check wording. Each patient's real details are filled in when the email is sent.